Blog 2 (Gears)
- yanzhen21
- Nov 17, 2022
- 9 min read
Hello everyone! I am back with another blog. This time, I am going to share with you the practical I just had called "GEARS". Well, it obviously involves gears. But in what way? Follow me as I guide you through this journey where I learn the ways of the gears.
What I will be covering in this blog:
The definition of gear module, pitch circular diameter and the relationship between gear module, pitch circular diameter and number of teeth.
The relationship between gear ratio (speed ratio) and output speed, between gear ratio and torque for a pair of gears.
How I can design a better hand-squeezed fan, including the sketches
How my practical team arranged the gears provided in the practical to raise the water bottle, consisting of:
a. Calculation of the gear ratio (speed ratio)
b. The photo of the actual gear layout.
c. Calculation of the number of revolutions required to rotate the crank handle.
d. The video of the turning of the gears to lift the water bottle.
5. My Learning reflection on the gears activities.
1. These are the definition of gear module, pitch circular diameter and the relationship between gear module, pitch circular diameter and number of teeth:
Gear Module refers to the size of the gear teeth. The unit for module is mm. As the module number increases, the size of the teeth increases. Gears that mesh together must have the same module to operate effectively.
Pitch Circular Diameter is the imaginary circle that passes through the contact point between two meshing gears between two meshing gears. It represents the diameters of the two friction rollers in contact and moves at the same linear velocity.
The relationship between gear module, pitch circular diameter and number of teeth can be demonstrated from the equation: PCD = m x z
PCD = Pitch Circular Diameter
m = Module
z = No. of teeth
2. Below is the relationship between gear ratio (speed ratio) and output speed for a pair of gears.
As the gear ratio increases, the output speed decreases.
Below is the relationship between gear ratio and torque for a pair of gears.
As the gear ratio increases, the torque increases.
3. Below are the proposed design to make the hand-squeezed fan better:

Modifications made:
The no. of gear teeth (z) and the pitch circular diameter (PCD) of big gears increases.
The no. of gear teeth (z) and the pitch circular diameter (PCD) of small gears decreases.
A smoother material is used for the gears
The big gears are the driver gears while the small gears are the follower gears. Thus, by increasing no. of gear teeth for big gears while the doing the opposite for the small gears, it will decrease the gear ratio. This also means that the PCD of the big gears and small gears have to increase and decrease respectively to allow their module size (m) to remain the same. This is to ensure that the gears can mesh together to allow the gear train to remain operational. In addition, the casing of the hand-powered fan that contain the gears have to be modified into a larger case.
When a smoother material is used to make the gears, the gear friction can be minimised so that the fan can operate at its desired level.
4. Below are the description on how my practical team arranged the gears provided in the practical to raise the water bottle.
To begin with, we started analysing the gears we were given. There were various shapes and sizes of gears with some compound gears too. Right off the bat, we saw two gears with crank handles. One of which was larger than the other. Using logical thinking, we knew our ultimate goal was to lift a water bottle with minimum force which also meant requiring the least no. of revolutions needed to rotate the crank handle. Thus, we needed a high gear ratio, increasing the torque of the gear train. To achieve that, we chose the smaller gear with the crank handle. Afterwards, we noticed that some teams have already started constructing their gear train on the board. My group was puzzled as to why they would blindly start without a concrete plan. With our limited knowledge, we only knew how to obtain a high gear ratio in a gear train with a few gears. However, we were given 8 gears in total, including compound gears which made it much more complicated. I thought of an idea of putting the gears in an order of the smaller gear followed by the larger gear. We repeat the cycle until the last gear which has a string attached to it to pull the bottle. Ultimately, we achieved a gear ratio of 18. We thought it was rather high and went to verify with our lecturer. In response to our question, he said something along the lines of the gear ratio could be improved. My group was rather shocked to find out that its possible to go beyond the value of 18. Therefore, we went back to the drawing board. After brainstorming for a few minutes, one of my groupmate came up a gear train that has a gear ratio of 26. It was significantly higher than the previous one. He basically made two pair of gears to cancel one another out, allowing the other gears to achieve a higher gear ratio. Hence, we started constructing the gear train on the board following the order we just obtained. It was relatively hard as we needed to screw on the gears on the board. Reaching the last gear of the gear train, we needed to use a different technique to screw it on. Instead of screwing from the front of the board, we had to do it from the back as the gear was thick due to the string attached in the middle. You would not be able to fathom the amount of anger inside of me when I trying to screw the last piece in. It took so long as I needed to do trial and error by inserting hole by hole to find the hole that connects the whole gear train together. After a few minutes, I finally got the last gear on the board which after then I found out that the whole gear train does not work. I previously said that the last gear was thick which meant that the gear teeths had to be on the board instead of the other way around. Due to our ignorance, our gear train involved the last gear to be facing the wrong way. This meant that the second gear had its gear teeth in contact with the middle part of the last gear, resulting in the gear train to be nonoperational. Thus, we decided to go with our gear train that has a gear ratio of 18. We also encountered a similar problem. Although the last gear was facing the right way, the second last gear was still in contact with the middle of the last gear. This can be seen from the image below.

By this point, we already made two failed gear trains regardless of their gear ratio value. We were very frustrated and came to realise that using logical reasoning and doing calculations were utterly pointless. We just needed to make sure that the gear train was actually operational. Thus, we quickly made one up and we calculated the gear ratio and it was 5.3. It was significantly lower than the previous two values. Regardless of the horrendous result, we were able to lift the water bottle for distance of 200 mm.
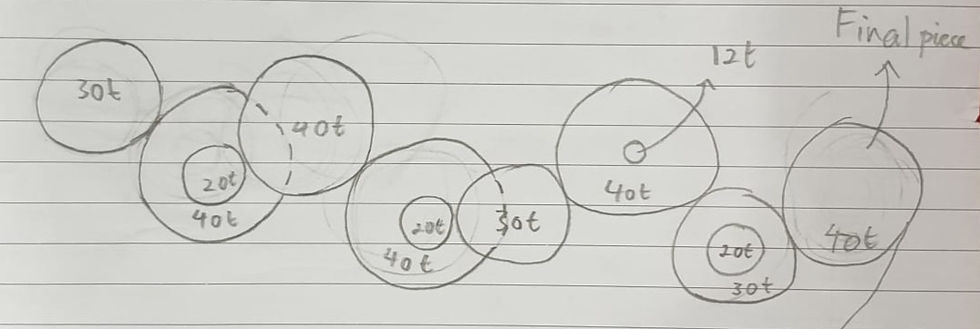
a. Calculation of the gear ratio (speed ratio).
For the calculation of the gear ratio, we can compare the no. of teeths.
40/30 x 40/20 x 40/40 x 30/20 x 40/30 x 30/40 x 40/30 = 5.333333
Speed ratio = 1/gear ratio
= 1/5.333333
= 0.1875
b. The photo of the actual gear layout.

c. Calculation of the number of revolutions required to rotate the crank handle.
The distance that the water bottle had to be lift = 200 mm
1 rotation = 2πr = πD
D = 22 mm
No. of revolutions at the output gear = 200/πD
= 200/22π
= 2.9
Gear ratio = Input RPM/Output RPM
5.333333 = Input RPM/2.9
Input RPM = 15.5
No. of revolutions required to rotate the crank handle = 15.5
d. The video of the turning of the gears to lift the water bottle.
5. Below is my Learning Reflection on the gears activities
Starting off from the preparation prior to the practical, we were tasked to watch 4 videos pertaining the fundamentals of gears. I felt that the knowledge that was obtained from the videos were very enriching. The videos were taught in a format where even secondary or primary school students could understand well enough. Some of the important concepts that everyone should know are the calculation of the gear ratio, the driver and the follower gear will turn in opposite directions and an idler gear could allow the driver and follower gear to turn in the same direction. I never had really understood the concepts relating to gears. I only came across gear pumps in W319 where I studied the mechanics of it for one of the practical in year 1. Recently, I also realised there were gears in my correction tape. I did know why this had intrigued me. Regardless, I carried my new obtained knowledge towards the practical.
During the start of the practical, we were required to complete a worksheet as a group. The worksheet required us to answer various kind of questions pertaining gears. There were also a couple of calculation questions involving simple gear trains and compound gear trains. In addition, the worksheet also gave us new terminologies used in gears that was not taught in the videos. However, it was thanks to the videos that we were able to answer most of the questions without help from online resources. Generally, it allowed us to learn more in depth on the concept of gears and allowed us to practice calculating the gear ratio. With this worksheet, we moved on to the next activity which was lifting a water bottle using gears. I had generally explained what happened during that activity in section 4 above. Reflecting back on it, it was actually quite enjoyable to construct the gears even though it was devastating that our carefully thought out plan did not work twice. Regardless, I gained valuable experience working with gears.
Moving on to the next activity which was constructing a hand-powered fan. We were given all the components required to assemble it. We just had to follow the placement of the gears in the image on worksheet that was showing the internal workings of the fan. In my opinion, this activity was much simpler than the previous one as we only had to follow the instructions given without giving too much thought into it. However, a problem came around when we were finishing our final step of inserting the turbine on the axle gear. The hole on the turbine was too small to be inserted into the axle gear. That point on, we just asked ourselves, how could the world be so cruel to us? We already suffered so much in the previous activity and just as we thought this activity was easy, this kind of issue would come upon us. Fortunately, each group was given two sets so we tried to construct the fan using the other one. Thank the lord that it actually works the second time. Well, aside learning the mechanics of the hand-powered fan in this activity, I learnt to resilient. Although that issue was not our fault, we should keep a cool head and find other alternatives or solutions to solve it. Relating to POS 2, where we learned problem solving skills. Using convergent and divergent thinking will help us gain the most effective and efficient solutions to all problems.
Moving on to the last part of the practical, we needed to do an individual test to test our knowledge on calculating the gear ratio or speed ratio. The test was relatively doable except for one particular part. We needed to find out the gear ratio in a gear train involving two gears. The only information given was the RPM of both gears. As we all can recall the gear ratio formula which is Output/Input. Well, I thought this also applied to RPM. In the question, the driver gear was bigger than the follower gear. As a result, the RPM of the driver gear would be lower than the follower gear. Using the formula I just mentioned, it gave a value greater than 1 which made no sense at all. Since the follower gear is smaller in size, it should have resulted in a gear ratio value that is smaller than 1. This had puzzled me. Then, I thought to myself again, we are dealing with RPM, so maybe the value I just obtained was the speed ratio? Using my genius brain, I flipped the formula into Input/Output to obtain a more sensible answer. From this incident, I learned that we cannot always put Output/Input to get the gear ratio. We need to see what information we are dealing with and always try to make sense of the answer before moving on.
Overall, this practical was very interesting and fun. It was a fruitful experience that allowed me to learn the ways of gears. Hopefully, I can be able to use this knowledge in future projects.


Comments